How to make a wood wick candle?
Welcome to the fun journey we're going on to make candles! You're in for a treat if, like us, you enjoy candles and wish to give your home a hint of rustic charm. We'll show you how to make your very own wood wick candle today. It's a magical creation that not only crackles soothingly but also creates a cozy atmosphere in the air. So let's start this simple candle-making adventure by donning an apron.
Obtain Materials for Your Creative Adventure

Let's gather all the materials we need to create our lovely wood wick candle before we start working our magic on the candles. What you'll need is as follows:
a high-quality wax of your choosing that burns cleanly and consistently (we suggest soy wax or beeswax).
Untreated wooden wicks are a need to preserve that rustic appeal.
Choose a heat-resistant candle holder that complements your decor and available space.
Fragrance oils are optional; treat your senses with mouthwatering aromas like lavender, vanilla, or citrus.
If you're feeling creative, use some candle dye to give your work a splash of color.
Befor you get more hand on, please keep the following items in place before you start.
a high-quality wax of your choosing that burns cleanly and consistently (we suggest soy wax or beeswax).
Untreated wooden wicks are a need to preserve that rustic appeal.
Choose a heat-resistant candle holder that complements your decor and available space.
Fragrance oils are optional; treat your senses with mouthwatering aromas like lavender, vanilla, or citrus.
If you're feeling creative, use some candle dye to give your work a splash of color.
To properly melt the wax, use a double boiler or a microwave-safe container.
a reliable thermometer to monitor the wax's temperature.
a metal or wooden spoon to stir everything around.
The wood wick should be adhered to the container.
To maintain your wood wick focused during the burn, use a wick holder or a reliable pencil.

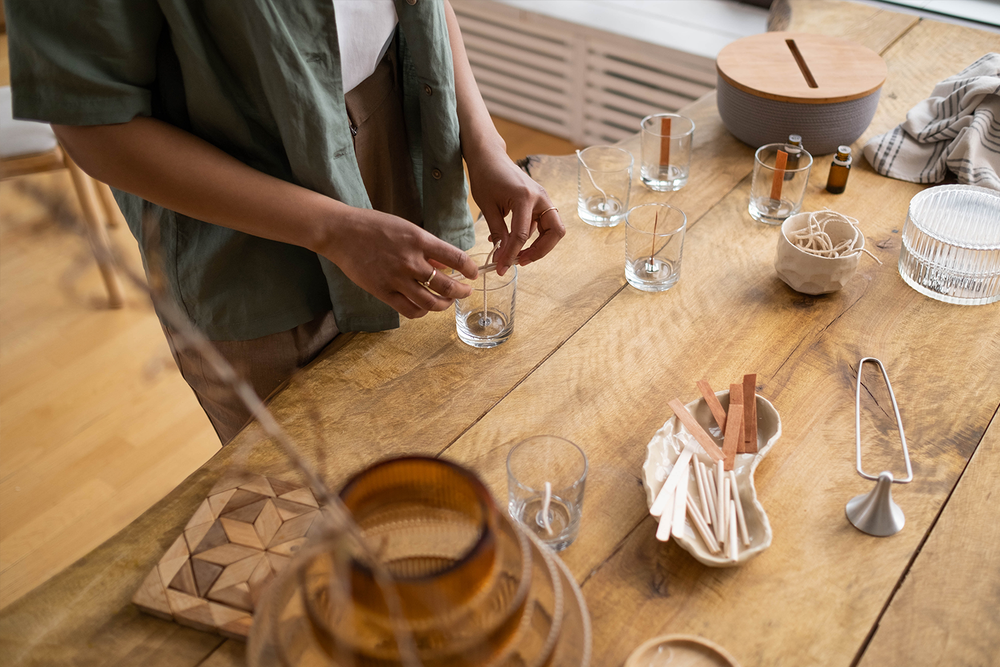
Getting Ready the Wood Wick
Let's get started by preparing the gorgeous wood wick, the star of our wood wick candle, now that we have all of our materials ready.
Take your wooden wick and trim it to a length that fits snuggly inside the candle container of your choice. Keep in mind to leave a few extra inches for trimming.
Pre-wax dip: Warm up your wood wick a little by dipping it briefly into the molten wax. This procedure stops the wood from absorbing too much wax during the pouring process.
The focal point: Set the wood wick carefully in the middle of your candle container while the wax is still warm. To keep it steady, use a pencil or a wick holder.
Melting the Wax with a Hint of Color and Fragrance
It's time to melt our wax at this point and, if you like, experiment with flavor and color.
A dream of two boilers: Fill a saucepan with water, then put a heat-resistant container with wax inside to create your double boiler. Follow the manufacturer's directions when using the microwave-safe container approach.
Wax temperature sweet spot: Warm the wax up gradually until it reaches the right temperature for the wax you've chosen. Use your dependable thermometer to keep a close watch on the temperature.
Color and fragrance magic: When the wax reaches the proper temperature, stir in your preferred fragrance oil (usually 1-2 ounces per pound of wax) if you're in the need for perfumed ecstasy. Introduce your selected candle dye and thoroughly blend it for a lovely shade to add a bit of creativity.
Pouring the Wax Carefully
The magic happens here, so let's take a big breath and pour our melted wax into the candle container.
The ideal pouring temperature is to let the melted wax slightly cool to prevent any accidents with our priceless wood wick.
The graceful pour: Carefully pour the wax into the container that has been prepared, taking care not to disturb the wood wick's position in the middle.
Set the scene now by allowing the candle to fully cool and solidify before moving it.
How to Trim and Light a Wood Wick Candle
Our wood wick candle is nearly ready to illuminate the room. But first, let's make a few final adjustments!
Once the wax has completely hardened, trim the wood wick to a length of about 1/4 inch.
Light your wood wick candle, relax, and take in the calming crackling sound and pleasant aroma that fill the air while you watch the magic happen.
What makes a woodwick candle special ?
The woodwick itself has a soothing cracking sound, which is reminiscent of a cozy and confortable fire place.
The wood wick helps the candle burn more evenly and consistently by forming a horizontal flame as it burns, which results in a captivating crackling sound. This produces a nice, rural ambiance that is ideal for unwinding or cozy nights.
Wood wicks can be made from a variety of woods, but some popular choices are cherry, maple, birch, and cedar. The type of wood used can affect the candle's burning properties and sound.
As for its safety concerns, wood wicks are generally safe as long as they are maintained properly. Another good tip to keep in mind , given the nature of wood wick, it is adviced to reduce the wood wick to around 1/4 inch, as this will therefore avoid too much soot and guarantee a consistent flame.

For more about candle making wax, candle making tips, and candle making supplies, please check out our other related topics.
Congratulations! You've just made your very own wood wick candle, giving your room a warm and magical atmosphere. You may now use your creativity to create candles that suit your personal style by experimenting with various scents, colors, and containers. This DIY adventure is only limited by your creativity. Soak up the light of your personal creation and don't forget to wow your significant others with your newly acquired candle-making skills.
Leave a comment